Showing posts with label bread. Show all posts

Thursday, April 05, 2012

Eggless Pineapple Bread

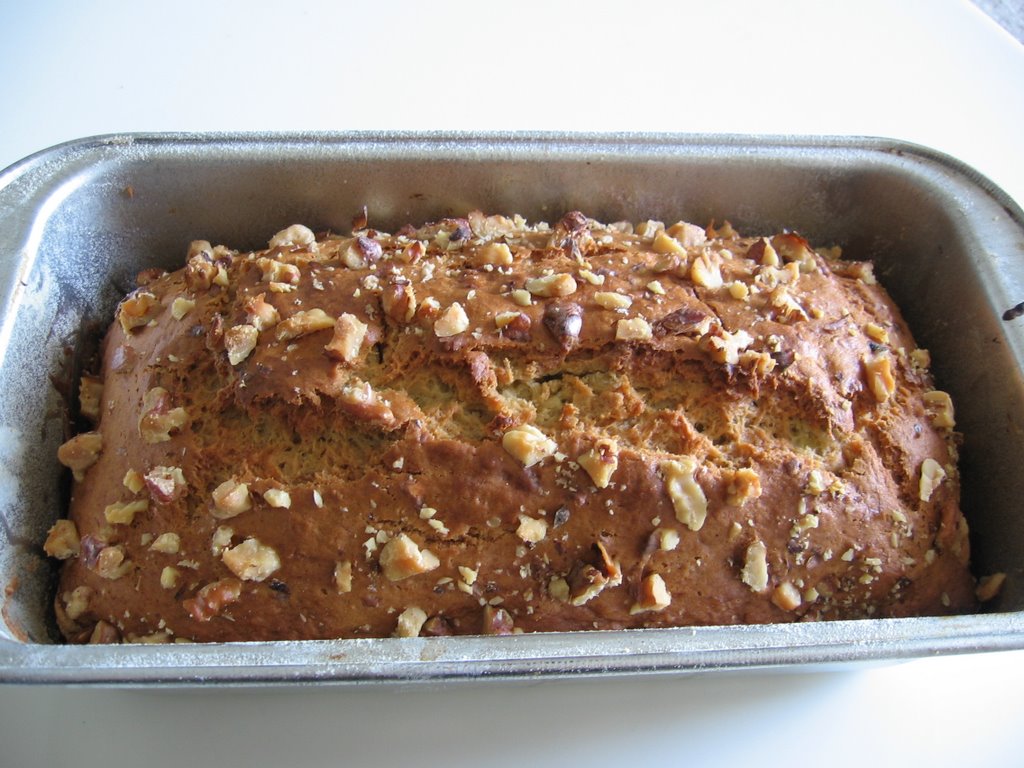
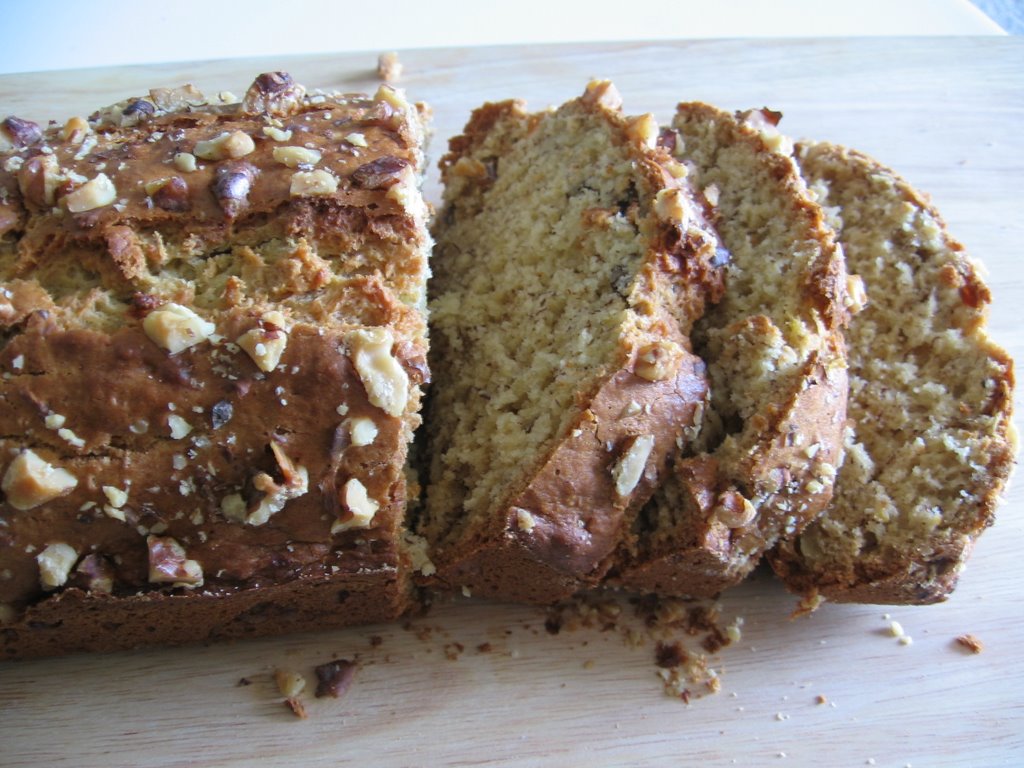
I opened a large can of chopped pineapple while experimenting with different toppings for my English muffin pizza. Apparently I used about two table spoon of it and the rest went into the refrigerator. Every time I opened the fridge I kept thinking of how to use the left over fruit.With new job and all I didn't have any time to browse for a new baking recipe with pineapple and finally decided to bake my favorite pineapple bread, which I have already blogged here. On a Sunday evening when I was all set to bake I realized that I ran out of butter and hence went ahead with oil and made it eggless too, nevertheless the bread turned out moist and soft.


Ingredients:
1 3/4 cup all purpose flour
1/3 cup oil
1 cup sugar
1 tin chopped pineapple (approx 2 cups)
1 tsp baking powder
1/2 tsp baking soda
1 tsp vanilla extract

1/4 tsp salt
1 tblsp flax meal(powder) mixed with 3 tblsp warm water


Method:
Preheat the oven to 350F/180C.
Butter  or line a loaf pan with parchment paper.
Mix the flax seed powder with 3 tblsp of warm water  and set aside for 10 mins.
In a bowl add the dry ingredients flour, baking powder, baking soda and salt, mix well to combine.
In a large bowl  mix in the oil, sugar, flax meal and vanilla extract. Beat well to combine.
To this add the dry ingredients and gently mix to incorporate. Do not beat or over mix.
Now add the chopped pineapple along with the liquid and stir to combine.


Transfer the batter to the loaf tin and bake for 45 - 50 mins.
The time can vary depending on the oven.So check periodically after 40 min's,a knife or toothpick inserted in the middle should come clean.


Note: If you want a mildly sweet bread reduce the sugar to 3/4th of a cup.
Replace the flax meal and water with 1 egg if you want to try with egg.

Friday, March 16, 2012

Lemon Blueberry Bread

I had a packet of frozen blueberries in the freezer with the idea of making a smoothie. Tried it once and the kid didnt like it at all. So I used half of them in this blueberry muffins earlier and the rest went into this delicious blueberry bread. Do try this recipe, its definitely a keeper.


Source - JoyOfBaking
Ingredients:
 1 1/2 cup All purpose flour
1/2 cup butter softened at room temperature 
1 tsp baking powder
1/4 tsp salt
3/4 cup granulated sugar
1 tblsp grated lemon zest
1 tsp vanilla extract
2 eggs
1 cup fresh or frozen blueberrries
1/2 cup milk


For the lemon glaze:
 2 tablespoon white sugar
1 tablespoon fresh lemon juice.


Method:
Preheat the Oven to 350F
Prepare a loaf pan by buttering up the sides and bottom.
In a large bowl add the flour, baking powder and salt, whisk well to combine.
Take a table spoon of this flour mixture in a small bowl and gently coat the blueberries.

In an other bowl cream the butter with the electric mixture until soft.
Add the sugar and beat for another 2 -3 minutes till it becomes creamy. 
Add the egg one by one and beat well to incorporate.
Scrape the sides of the bowl using a spatula and beat the mixture till its smooth and pale.
Now add the flour mixture in three additions alternating with the milk, ending with the flour.
Gently fold in the blueberries. Do not overmix.


Transfer the batter to the prepared loaf pan and bake for 50-60 mins or until the toothpick inserted in the center comes out clean.


For the glaze:
Place the pan on a wire rack. 
In a microwavable bowl add the sugar and lemon juice , warm it up for 20 secs or just until the sugar dissolves.
Poke holes on the bread with a tooth pick and then gently brush the top with the warm liquid. 
Remove from the pan after 20 minutes.


Notes:
If using frozen blueberries , do not thaw, toss with flour and directly add to the prepared batter.
Do not skip the glazing part, its not too sweet and gives the bread a moist texture.


Thursday, February 23, 2012

Simple Garlic Bread - My Way

Whenever I make soup of any kind, I tend to make garlic bread. Usually I add the butter - garlic mixture to the sliced bread and broil in the oven for about 5-6 minutes. But for the past few years I have been making it in a different way and love the bread made this way to bits and pieces. It makes the bread soaked up with the garlic flavor, without making them too crusty. I came across this method of baking garlic bread when browsing through one of the cookbooks from the library. I don't remember the name of the book but this tip got struck in my head forever :) 


Ingredients:
1 medium french baquette (I used a multi grain bread)
8 cloves of garlic chopped finely
2 tblsp butter
3 tblsp olive oil.
1 tsp dried oregano
salt and pepper as per taste


Method.

Preheat the oven 350F

Chop the garlic finely.I used a garlic press from Ikea, such a nice kitchen accessory.

Mix  it up with butter, olive oil, oregano salt and pepper.Let it sit for 15 minutes.


Slice the bagutte in to thin slices 3/4 the way (not into separate pieces).

Fill up the slits with garlic mixture.  Brush the remaining mixture on top of the bread.


Wrap it up tightly with aluminium foil

Bake in the 325F  oven for 20 minutes.


Note :  You can also decrease the amount of butter and increase the olive oil, that works great too.
Home made garlic bread  is always the best as you can control the amount of salt as well as butter as per our need.
For more crispier slices grill it in the broiler for a minute or two.


Wednesday, December 01, 2010

Pumpkin Bread

The first week of November was pumpkin week at school. We had to find some odd shaped pumpkins (big or small) for the school display. In that searching process we ended up with some really cute pumpkins. I made a soup and a curry ( twice ) but still had two more to go. Then I remembered the post about how to make pumpkin puree from DK's blog. I successfully made two jars and  also made this Pumpkin bread using the puree the very next day. The recipe for this bread has been in my bookmarks for ages and I finally got a chance to make it.
I was expecting a dark coloured Pumpkin bread like the ones we get in Starbucks( Iam a big time fan of that) ,but mine turned out more orangish. Its more related to the variety of the pumpkin I guess, Nevertheless the taste was wonderful and we loved every bit of it. I more or less followed the original recipe except the olive oil and added some cloves to have a strong flavour.


The original recipe is from  Simply Recipes Blog


Ingredients

1 1/2 cups (210g) flour
1/2 teaspoon of salt
1 cup (200 g) sugar
1 teaspoon baking soda
1 cup pumpkin puree
1/2 cup oil
2 eggs, beaten
1/4 cup water
1/2 teaspoon nutmeg powder
1/2 teaspoon cinnamon powder
1/2 teaspoon cloves  powder (optional)
1/2 cup  chopped walnuts


Method:

 Preheat oven to 350°F (180°C). 
Sift together the flour, salt, sugar, and baking soda.
If you do not have the spice powders, just go ahead and powder the whole cloves, cinnomon and scrape the nutmeg.Worked well for me.
 Mix the pumpkin puree, oil, eggs, 1/4 cup of water, and spices together, then combine with the dry ingredients, but do not mix too thoroughly. Stir in the nuts.
 Pour into a well-buttered 9x5x3 inch loaf pan. Bake 50-60 minutes until a thin skewer poked in the very center of the loaf comes out clean. Turn out of the pan and let cool on a rack.
Makes one large loaf


Tuesday, May 04, 2010

Bread Rolls/Parcels

Though I have read about bread rolls several times in many cookbooks, magazines, blogs, and foodwebsites I have never tried it until recently for a potluck lunch. It didnt soak much oil as I initially thought and it retained its crispiness even after few hours.I have made it twice after that and it came out very well each time. Makes a great party starter.

The recipe for the filling is very versatile, and you can make it according to your tastebuds. This is how I made it.
This recipe make 10-12 bread rolls

For the Filling:
Ingredients:

4 medium potatoes 
1 tsp ginger garlic paste
1 medium onion chopped

1 tsp jeera
1 tsp chilli powder
1/2 tsp garam masala powder
1 tsp chat masala powder.
1 tblsp lemon juice

Method.
Boil the potatoes, peel the skin and mash it .
Add 2 tblsp oil in a pan and add the cumin seeds.
When it crackles add the chopped onion and saute well.
To this add the ginger garlic paste, and all the dry powders and fry till the raw smell disappears. Sprinkle some water if necessary.
Now add the mashed potatoes, and mix well with the masala.
Finally add salt, chopped coriander leaves  and lemon juice, mix well to combine.

For the Rolls:

Ingredients.

12 slices white bread.
a bowl of water.
2 cups bread crumbs
oil for frying

Method:
Trim the edges of the bread and keep aside.
Take each slice , dip in the water, keep inbetween your hands and squeeze out the water.
Spread the sqeezed bread slice on a flat surface, place the filling towards one edge, roll it and seal the edges by slightly pressing them.
Roll it over the bread crumbs and fry in hot oil.

Note: The oil should be hot , not smoking hot. Coat the rolls well with bread crumbs and pat it your palms before dropping it in oil.This helps in shedding the excess crumbs, that might clog the oil.

Monday, December 28, 2009

Weekend Baking - Dates, Prunes and Walnut Bread.


Baked this beautiful bread over the Christmas weekend.
The baking saga started like this. I started browsing through my bookmarked baking recipes on friday morning which continues till sunday evening. There were rolls, buns, cakes, muffins, cookies and what not....I felt like going on a baking spree and start a baking marathon. You might ask me whats the hurry....But this is my last week with the Oven. Yes we are moving to a new house without an oven, and as the move is temperory, we do not want to invest on an oven. Iam going to miss Baking :(.
So I have planned to do as much as baking as possible, atleast try out my most favourite bookmarked recipes, take pictures and save it in my archives for future blogging. Managed to bake some cookies, a cake and this bread by sunday evening, quite satisfied with my work :)
While the cake was ok, this bread turned out great. The original recipe called for just Dates an Nuts. Since I had less quantity of dates, I throwed in some prunes and walnuts.

Recipe source:Joy of Baking
Ingredients:
1/2 cup walnuts
1 cup chopped and pitted dates
1 cup chopped and pitted prunes

1 cup boiling water
1 tsp baking soda

2 cups All purpose flour
1/2 cup light brown sugar
11/2 tsp baking powder
1/4 tsp salt
1/2 tsp cinnomon powder ( I used 1 tsp)
1 tsp  vanilla extract

1/2 cup cold butter
1 egg


Method.
Add the dates and prunes to 1 cup of boiling water, along with baking soda and allow it to cool(atleast 1 hr)
Preheat Oven to 180C. Grease and prepare a bread loaf tin for baking.
Beat the egg and vanilla essence in a seperate bowl
In a seperate bowl add the flour, sugar, cinnamon and baking powder. Mix well to combine.
Add the cold , soft butter to the flour mixture and using a electric beater or food processor, mix, till the mixture resembles coarse bread crumbs.
Add the fruits along with the liquid.Add the chopped walnuts .Mix well to combine

Pour the mixture to the greased bread tin and bake in the preheated oven for 50 - 60 minutes.

Tuesday, December 22, 2009

Hot Cross Buns ..Hot Cross Buns


Hot cross buns, Hot cross buns
One a penny , two a penny
Hot cross buns
If you have no daughters ,
 give them to your sons
One a penny , two a penny
Hot cross buns.

I never knew that such buns really existed until I started blogging.Have been thinking that these were some fancy made up buns for the kids rhymes.Still remember the day when I came across this recipe in a blog , during my early days of blogging, called up my sister and was chatting about it and its history for quite sometime :)
Traditionally these buns are made as a breakfast for the Easter sunday. But for me whether its Easter or Christmas its just the holidays and the holiday spirit that engulfs us matters a lot, hence decided to bake this flavourful bread the past weekend.

 I had picked up couple of cooking books published in the 1980's called the "Hamlyn - The All Colour Cookbook " from the local flea market recently.(These were the only books I could find in english ). It has the recipes for traditionally baked english goodies and 'Hot cross Buns' is one of them.


It may seem like lot of work, but its totally worth the effort.
All the measurements were in oz and pints, I converted them to cups and tblsp for our convenience. Here is the recipe

Ingredients:

12 0z / 3 cups Flour
1 tsp salt
1 tsp cinnomon powder
1/2 tsp of nutmeg powder
1/2 tsp of all spice powder(optional)
1/4 cup sugar
4 tblsp melted butter
1 eff beaten
1 cup raisin/sultanas/currants

For the yeast mixture:

1 tblsp   dried yeast
 1tsp sugar
2/ 3 cup warm milk (11oF)
2/3 cup warm  water less 3 tblsp
1 cup plain flour

Makes 12 medium sized buns

Method:


Step 1:

Take a large bowl.Blend yeast with mixed warm milk , water , sugar and flour.
Leave until frothy, about 20-30 minutes.


Step 2:
In an another bowl sift together remaining flour (3 cups) salt and spices.Add sugar and mix well.
Step 3:
Beat the egg seperatly.  Stir butter, egg and the flour mixture into the yeast mixture.Mix well


Step 4:
Knead the dough on a lightly floured surface for approximately 10 minutes. Make into a smooth ball, cover with a tea towell or a tight lid and allow it to raise for 1 - 11/2 hour or until the dough is double in size.


Step 5:
Punch down the dough with your knuckles gently, take it on a lightly floured surface. Shape it to a log and divide into 12 equal portions. Take each portion and shape it into a ball by using the palm of one hand, first presing down hard and then easing up.


Step 6 :
Place it on a Baking tray lined with parchment paper, spaced well apart. Cover with a towel or greased polythene bag and allow it to rise for another 30 mins.

As you can see from the picture that I didn't shape the balls properly as I didnt follow the rolling into log and cutting equal shapes part.I just pinched the dough approximately like we do for chapati's.
But the earlier method works the best

Step 7:
Preheat the Oven to 180C.  Make a cross witha very sharp knife to just cut surface of dough. Cut with a sharp knife little deeper , for more prominent cross after baking.Bake in the oven for 15 - 20 minutes. Enjoy the aroma that fills your house.


Step 8 :
For the glaze, Bring 2 tablespoon of milk and 2 tablespoon of water to the boil, stir in 2 tblsp of sugar and boil for 2-3 minutes. Brush hot buns twice


Enjoy your weekend breakfast with a cup of tea.
Taste better the next day when all the sugar  and cinnomon seeps in. 


To serve:  Cut the buns into half .Toast slightly with butter and serve warm.

Monday, May 05, 2008

Pineapple bread


Pineapple bread

Felt like baking something this weekend, but was not in a mood to try something new.
So I took the good old banana bread recipe , did some modifications and just used canned pineapple chunks instead of banana.
Turned out very flavourful and tasty.
Should Definitely try with a scoop of Ice cream.


Ingredients:

2 cups all purpose flour
1 egg
1/2 stick butter/ 1/4 cup softened butter
3/4 cup sugar
1 small tin chopped pineapple
1 tsp baking powder
1/2 tsp baking soda
1/4 tsp vanilla extract

Method

Preheat the Oven to 180C
Mix in the butter and sugar.Beat till smooth and frothy.
Sieve the flour and baking powder and soda mixture three times.
Beat the egg separately and add it to the butter mixture little by little, while mixing simultaneously.
Add the flour mixture and mix well.The mixture will be very thick at this stage. Fold in the pineapple pieces at this stage and mix well.Add the remaining juice also and mix well.
Grease the baking tray with butter, dust it with some flour.Pour in the mixture and place it in the preheated oven.

Bake for 45 -50 min's.The time can vary depending on the oven.So check periodically after 40 min's,a knife or toothpick inserted in the middle should come clean.


Tuesday, March 21, 2006

Banana Nut bread


Banana Nut Bread

Its Baking Time this weekend.Its been a long time since I baked something.
When I first came here to US, I was very excited to see the ovens in the apartment, which motivated me to try baking.To start with I used all the store bought cake mixes, which came out wonderfully.How many ever time you bake, the excitement to see your final product is always the same...Dont you all agree....
One of my collegue Invited me to her sons birthday party.She had baked a nice and delicious cake, when I asked about the receipe, she told me that it was a Banana bread receipe without a egg.Since they were Jains, they didnt want to buy cake from the stores.But their cake was very soft and it was a hit. So I got the original Banana bread receipe from her and started experimenting with it by adding an egg, it turned out good.

Nowadays I make it atleast once in a month for ourselves or as a nice gesture for friends when they invite us over for dinner.
Last week we had India - Pakistan one day match, and one of our friends invited us over to watch the overnight match.It sounded fun, so I decided to bake the Banana bread for some midnight snacking.

Ingredients.

2 cups all purpose flour
1 egg
1/2 stick butter
1 cup sugar. ( I used only 3/4 cup as I wanted to cut down on sugar)
2 Rippened bananas
3 tblsp milk
1 tsp baking powder
1/2 tsp baking soda
1/4 tsp salt
1 cup chopped walnuts
1/4 tsp vanilla essence or powder

Method:

Preheat the Oven to 350F/180C
Mix in the butter and sugar.Beat till smooth and frothy.
Sieve the flour and baking powder, soda, and salt mixture three times.
Mash the bananas well with the back of the fork
Beat the egg seperatly and add it to the butter mixture little by little, while mixing simultaneously.Add the flour mixture and mix well.The mixture will be very thick at this stage, add the milk now and mix well.Fold in the bananas at this stage and mix well.
Now add half of the chopped walnuts.
Greese the baking tray with butter, dust it with some flour.
Pour in the mixture and place it in the preheated oven.
Sprinkle the remaining walnuts over the spread.
Bake for 45 -50 mins.The time can vary depending on the oven.So check periodically after 40 mins .a knife or toothpick inserted in the middle should come clean.

You can Enjoy this bread as breakfast or a snack along with tea.
Happy Baking.

Related Posts with Thumbnails