Showing posts with label dessert. Show all posts

Tuesday, January 04, 2011

Pal Koz(l)hukattai / Paal Kolukattai with Sugar

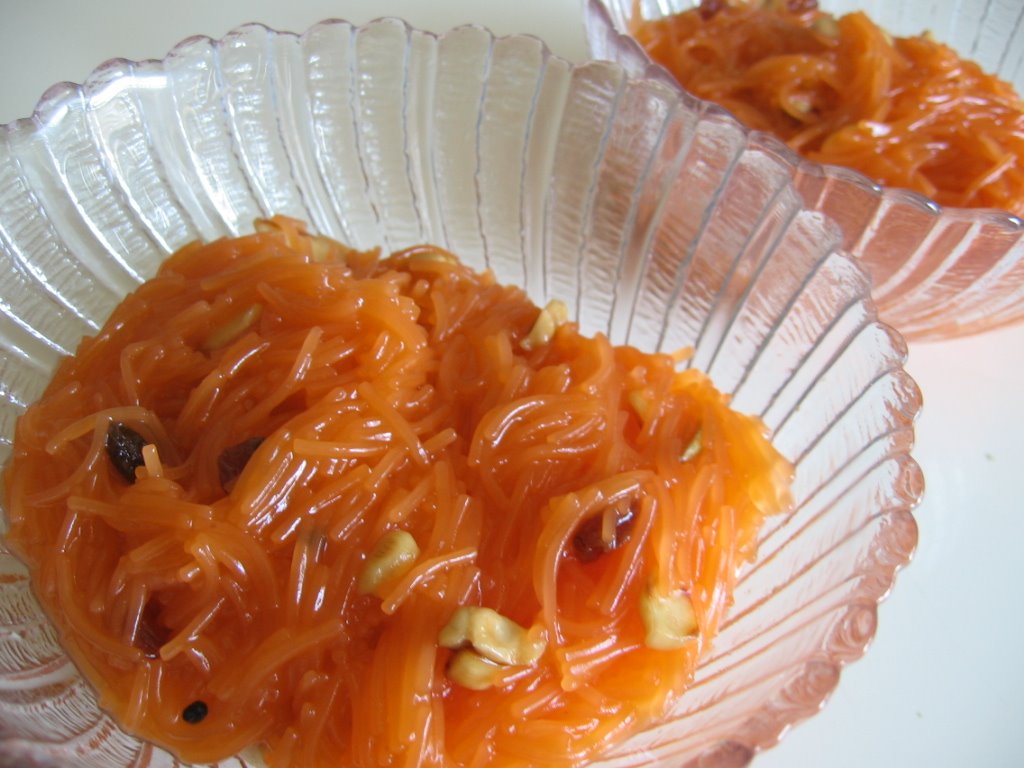
Like Everyone else in the Food blog world , I wanted my first post of the year to be a dessert or a sweet recipe. Hence this Palkoz(l)ukattai, a traditional Tamilian sweet/payasam  made with riceflour, sugar, milk and cardamom. I have already blogged about this one way back in 2006, but with jaggery instead of sugar. Its one of the popular posts in my blog to date


This is one of my favorite sweet and has loads of childhood memories attached with it. This is my Grandma's speciality and after her I dont remember anyone in  my maternal household making this nowadays.
Probably its time consuming and everyone gathers around in one place just for special occasions like weddings etc. In these days of fast travel, if at all we visit our native, its reach there by morning and start by night. Oh... how  I terribly miss my long summer holidays and endless chatting with cousins throughout the night.
Anyways traditionally this sweet is prepared by rolling the rice flour into small balls, first cooking them in boiling water, and then with milk and sugar. But I always use a shortcut method of directly pressing the prepared dough using a murruku press into the hot boiling water and then stir to break them.  Its a great way to involve the kids if you opt to make the kolukattai's the authentic way.

Ingredients:
1 cup Rice flour
3/4 cup sugar
1 cup milk
3 pods cardomom
4 cups of water
1 cup shredded coconut.


Method:
Crush the cardamoms to a fine powder.
Boil half cup of water with a pinch of salt
Add this boiling water to the rice flour and stir well with a wooden spoon, like you do for regular kollukattai or Idiyappam. Allow it to cool slightly.
At this stage you can proceed in two ways.
Boil 4 cups of water
Pinch the flour and roll into very tiny balls using your palm and put them in a plate or paper.Once all the dough is rolled, add them to the boiling water little by little. 
 (or)
Boil 4 cups of water in a thick bottomed vessel.
Place some prepared flour into the murruku press (with one hole) .
When the water is boiling , press the dough directly in it. Wait for a minute and then stir with a laddle gently to break into pieces. Wait for 2 minutes before doing the next batch.


Once the dough is all done, allow it to cook well in the water for about 5 mins.
Parallely warm a cup of milk in the saucepan.
Add the sugar, stir well and cook for another 5 mins. 
Now add the warm  milk and cardamom pods and give it a good stir.
 Boil for another 10 mins. Stir at intervals to avoid burning.
Finally add shredded coconut (fresh or desiccated) , mix well , cook for a minute and switch of the stove.
The payasam will become thick as it cools down.


Notes:
The water should be really really hot, boiling with bubbles  otherwise the koz(l)hukattai will not retain its shape and not cook properly. 


Variations:
Palkolukattai with Jaggery
There are lots of variations to this recipe.
1. You can add Jaggery instead of Sugar like here
2. Substitute milk with Coconut milk  or equal proportions of both.
3. Sometimes my Mom adds shredded lauki /surrakkai to the boiling water before adding the koz(l)ukkatai which also gives a delicate taste to this dish.


This recipe serves 5-6 people. This dish can easily be made ahead of time and refrigerated.Warm just before serving.


Sending this to the Food Pallette series - White held at Torview

Wednesday, January 06, 2010

Turkish Baklava

We were busy packing and moving to the new house during the new year weekend that I couldnt wish you all. So I would like to take this time to wish all my readers and blog friends 

 "A Very Happy and Fabulous New Year"


I wanted my first post of the new year to be on the sweeter side. So I decided to give the Baklava recipe posted by DK (of 'The ChefInYou) a try. I had bookmarked this as soon as it was posted, but I tried it rather quickly compared to my other favorite bookmarked ones. I have never tasted this sweet, but her pictures , the step by steps and the post in general were so tempting that got I hold of a pack of phyllo sheets immediatly the next time I went shopping. 

The recipe was very simple compared to the richness of the sweet, but handling of the phyllo sheets was a little bit dificult as it gets dried up faster.So has to keep them covered and work with them one by one.
As DK had warned in her post, the dish was very addictive and I could not restrain myself going to the refrigerator now and then. Its high in calories, but a piece of this sinfully delicious sweet is worth trying once in a while. I made my version with lightly toasted walnuts and almonds, but I think addition of pistachios would make it more favourful.
I strongly recommend this recipe as a 'must try'  one for those who can get hold of the phyllo sheets.


Recipe source - TheChefInYou
Ingredients:
2 cups  finly chopped almonds
1 cup chopped walnuts
2 tblsp cinnnamon powder
1/8th tsp clove powdr
2- 3 tblsp bread crumbs ( I missed it somehow, but better to add it )

For the syrup
2 cups water
2 cups sugar
1 stick cinnamon
1 tblsp lemon juic.

Method

Preheat the oven to 160C.
Mix all the ingredients for the filling and keep aside.
Butter a glass shallow dish with butter
Place 8-10 sheets of  phyllo one by one buttering each layer as you go.
Now spread the filling mixture evenly
Place the othe 10 sheets over the filling buttering each sheet as you go.
Using a sharp knife carefully cut the pastry into diamonds.
Place in the oven and bake for 50-60 mins.(until the top is golden brown).

While its baking prepare the syrup.
Boil the ingredients for the syrup and cool till its slightly warm.
When the Pastry is out of the oven leave it for 5 mins.
Now pour the syrup all over it.


How easy was that ....
And now for the hardest part ....Wait 8 hrs for  the syrup to be soaked well. You can leave it over night on the counter, no need to refrigerate.

Enjoy a large piece of this delicious pastry for yourself first thing in the morning ...


Tuesday, November 17, 2009

My First Chocolate Cake

For an ardent chocolate cake lover like me it took me this long to bake one. I like plain chocolate cake with simple icing , not those which are loaded with layers of cream. So I usually satisfy my craving by settling on the store bought mixes. But this time I decided to give it a go and tried out the recipe from Pusiva's culinary studio. I did'nt like the strong bitter flavour of the cocoa powder that I get here, so used chopped cooking chocolate instead. The cake turned out to be moist and perfect, exactly the way I like it.

We had the cake with some whipped cream, but next time I will make a single layer of chocolate Ganache.


Recipe Adapted from Pusiva's culinary studio.
Ingredients:
1 1/4 cup plain flour
50gms of cooking chocolate.
3/4 tsp baking powder
3/4 tsp baking soda
2 tbsp hot water
1 tsp instant cofee powder or granules
1 cup sugar
2/3 cup butter
2 eggs
1 tsp vanilla essence
3/4 cup water


Method:
Melt the chocolate by double boiling method and allow it to cool.
Mix the coffee poder in the hot water and allow it to cool.
Grease and prepare the cake pan
Seive the flour , baking powder and soda together.(if you are using cocoa powder, include that here)
Beat the buttr and sugar until light and fluffy.Add the egg and beat well for a min.
Now add the cooled chocolate, cofee mixture, vanilla essence , beat for approxately 2 - 3 min.
Add the flour little by little alternatly with water, finally ending with the flour mixture.
Give it a gentle stir by hand until all the flour dissolves. Do not beat while adding the flour.
Pour the mixture on to the prepared pan and bake in an 175C oven for 40 - 45 mins.


Note:
If your cake is browing quickly throw in a sheet of foil over the top of the pan after 20 mins of baking.
I baked the cake twice with and without the coffee powder , it tasted great. So the coffee powder is completly optional.


Having baked my first Chocolate cake I have gained confidence to try out so many different versions of chocolate cake out there with diffrent Icing. So you can expect few more posts on chocolate cakes from me in the future.

Enjoy !!!
Iam sending this Chocolate Cake over to Cook for Yourself event at Food for 7 stages of life.

Friday, July 25, 2008

Healthy Peach upside down cake.


Well, this post is a result of a huge bag of peach that I brought from the farmers market two weeks back. Not only Peach I also brought Plums and Cherries. Could not resist them as they were fresh , glowing and not to say they were on Sale too!!!. Thats why I love summers. While cherries and plums got over by sunday evening peaches were not touched. As my Husband hates peaches, the whole week I managed to finish off most of them by myself.

Finally I had 5 more ripe peaches left in the basket, and I started looking for a peach cake recipe. As usual I mix and matched few recipes and came up with this healthy version(no butter , no egg but some oil though) which made a delicious snack for our short trip over the weekend. Here is the recipe.


Ingredients:
For the base.

4-5 ripe but firm peaches
2 tblsp brown sugar
1 tsp cinnomon
1 tsp flour
1 tsp vanilla powder/essence

For the Cake:

1 cup All purpose flour

1/3 cup sugar
1/4 cup oil
1/2 cup milk
1tsp Baking soda
1 tsp cinnoman
1 tsp vanilla essence/powder

Method:

Preheat the oven to 350F /180 C

Coat the baking pan with a tsp of melted butter.

Blanching:

Boil a pot of water, remove from the heat and put the whole peaches in it, close with a lid. Peel the skin after 10 minutes.


Slice the peaches and place in a plate. Sprinkle cinnomon, brown sugar and vanilla essence and flour over it. Carefully toss it using a spoon so that its well coated.
Arrange these slices on the Baking pan. Reserve the left over juices from the fruit.


For the cake beat the sugar and oil well, and the add milk beat well. Sift the dry ingredients once or twice and then add to the sugar oil mixture. Add the reserved juices and blend well.
Pour the mixture over the arranged peaches. Bake for 30-35 mins


Invert the cake after its completly cooled.


Serve warm with a dollop of vanilla ice cream.


Since Peaches are very much in season here in july and august off this dish goes to the "Eating with the Seasons" hosted by Maninas

Thursday, July 03, 2008

Asha's Carrot-walnut cake


I have made carrot walnut muffins earlier.Was thinking of making the same recipe into a bread as a dessert for a dinner with friends.But came across Asha's Carrot cake recipe and my mind was set on it.
Whipped it first thing the next morning and it turned out great.

Some recipes will be in your bookmarks for ages, waiting for the moment, but some recipes will immediatly get your attention and make you get right into it.This is one such recipe.


Posting the recipe just for the record. I didnt prepare the glaze, however Iam publishing it for keepsake.Thanks Asha for such wonderful quick recipes


Ingredients
2 cups all purpose flour,
1/2 cup chopped walnuts,

1/4 cup Raisins,
1/2 granulated sugar,

1/2 cup brown sugar packed,
3 teaspoons baking powder,
1 tsp ground cinnamon,

1/2 tsp salt,
2 cups finely shredded fresh carrots,
1/2 cup milk,
1/3 cup vegetable oil,
1 egg.

How to bake:
Preheat oven to 350F/200C
Spray with no-stick oil inside one 9 1/2 x 5 1/2" loaf pan or three 5 3/4 x 3 1/2 inch loaf pans.
In a large mixing bowl, combine the flour, nuts, sugars, baking powder, cinnamon, and salt until well blended. Stir in the remaining ingredients just until moistened.
Spoon into pan or pans. Bake 50 to 60 minutes for a large loaf, 35-45 minutes for small loaves, or until they are baked in the middle.
Cool on a rack before glazing.Place a wide plate under the cooling rack to glaze.


Glaze:

mix 1/2 pack of Cream Cheese,
1cup powdered sugar or more or less than you like,1 tsp Vanilla essence,drop or two Orange food color,and add enough milk to make it thin enough to pour to coat the cake.

Heat this for 40 secs in the microwave,not more than that.Whisk and pour on the cake with a plate underneath the cooling rack to catch the extra glaze.
Let the get firm on the cake and replace the plate with another and pour the glaze again on the cake until evenly coated.Garnish with baby carrots and walnuts.
Cover and chill the cake if you like or keep it in the cake dish covered.Tastes great the next day with all the goodness of Carrots and Walnuts!:)

Tuesday, May 20, 2008

Pal Kozhukattai / Paal Kolukattai


Pal Kozhukattai Payasam

This is one of my favourite childhood dessert.Its made of small rice flour balls cooked in boiling water. I remember this sweet being made in my grandma's place during summer holidays.Since it takes a lot of time and people to make the tiny rice balls my grandmother would give each kid a big rice flour dough ball and large sheet of news paper and ask us to work on it.Its her way of controlling us from playing in the hot summer sun.We will be sitting in a big circle in our 'mutram'(the center of the house with open roof), chatting and telling stories to each other about our places and schools and slowly make tiny balls out of the big rice dough and roll them to the paper.Once we are done, my Grandma would turn it into an amazing desert within matter of minutes.But then comes the waiting around part.The sweet would be so hot, that our mothers would serve the pal kozhukattai into bowls and ask us to wait until its cold, but every time I used to burn my tongue due to my impatience : )..Finally by evening our whole afternoons effort would be rewarded by the taste of this wonderful delicacy.hmm ..anyways this is how the sweet is traditionally made in our native place.But since we dont have the time and patience to sit and make small rice dough balls, I used the murukku press and squeezed the rice flour dough directly into the boiling water, stirring it while filling the press for the next batch.Hope it doesnt sound complicated. This is a great dish to involve your kids, especially during the holidays.....

Here comes the recipe...

Ingredients :
2 cups of rice flour
2 cups of jaggery (mashed)
2 elaichi pods
1 cup milk
8 cups of water
1 cup of shredded coconut
1/4 cup roasted cashews(optional)

Method
Add some salt to 1 cup of water and bring to a boil.
Add the hot water to the rice flour and and mix with a wooden spoon.The consistency should be the same as we do for kozukattai or Idiyappam. mix the flour and make it into a ball.the flour should not stick to your fingers.
Boil the remaining water in a wide thick bottomed vessel, preferably a pressure cooker.
When the water is boiling , add the flour to the murruku press and press directly into the water.When the first set is over, stir the water 2 0r 3 times so that the kozukattai breaks into pieces.Repeat the same until all the flour is done.
At this stage add 1 cup of boiled milk and stir well.(we can also add 1 cup of fresh coconut milk if we are do not watch calories or fat).
Parallely add the jaggery in a vessel add 1/2 cup water and bring it to boil.Once the jaggery is melted and boiling, filter the syrup and add this to the kozukattai kanji.This is to ensure that there is no mud in the jaggery.
Add the elaichi and check for sugar.If needed add more jaggery.Reduce the heat to medium and allow the kanji to boil for atleast 20 mins.Stir every 3 mins to avoid sticking at the bottom.Finally when its thick to a certain extent add the shredded coconut,mix well and switch of the stove.
Allow it to cool before serving.The palkozhukattai will become more thick, when its cooled.

Note: This can be done using Sugar rather than Jaggery.Only difference will be the colour Both ways the taste of sugar soaked rice balls with coconut flakes and elaichi is heavenly.you should definitely try this for dessert.


I had this post published 2 years back, but since its been flooded with spam comments while I was on a break , publishing it again and also thought it would make a nice entry to the

"Think Spice event - Cardomom", held by EC as elaichi brings out the true flavour of this dessert.


Update :  Click here for  Palkozhukattai with sugar 

Monday, May 05, 2008

Pineapple bread


Pineapple bread

Felt like baking something this weekend, but was not in a mood to try something new.
So I took the good old banana bread recipe , did some modifications and just used canned pineapple chunks instead of banana.
Turned out very flavourful and tasty.
Should Definitely try with a scoop of Ice cream.


Ingredients:

2 cups all purpose flour
1 egg
1/2 stick butter/ 1/4 cup softened butter
3/4 cup sugar
1 small tin chopped pineapple
1 tsp baking powder
1/2 tsp baking soda
1/4 tsp vanilla extract

Method

Preheat the Oven to 180C
Mix in the butter and sugar.Beat till smooth and frothy.
Sieve the flour and baking powder and soda mixture three times.
Beat the egg separately and add it to the butter mixture little by little, while mixing simultaneously.
Add the flour mixture and mix well.The mixture will be very thick at this stage. Fold in the pineapple pieces at this stage and mix well.Add the remaining juice also and mix well.
Grease the baking tray with butter, dust it with some flour.Pour in the mixture and place it in the preheated oven.

Bake for 45 -50 min's.The time can vary depending on the oven.So check periodically after 40 min's,a knife or toothpick inserted in the middle should come clean.


Monday, April 28, 2008

Carrot Halwa


Starting up with a mighty dessert.

This receipe takes time- atleast an hour, but its worth the effort.If you are planning this for a dinner, you can make it well ahead atleast a day before and refrigerate it.


Warm it up just minutes before serving dessert.


Tastes great with a scoop of vanilla Ice cream...

Ingredients:

10 medium fresh carrots - shredded
2 cups of milk
cashews and raisins- handful
a pinch of salt
11/2 cup of sugar- can be adjusted
few tsps of ghee.

Method
Add 3 tsps of ghee in a hot non stick pan.
Fry the cashews and raisins to golden brown and keep them aside
Add the shredded carrots to the remaining ghee in the pan and stir them for 10 mins till they shrink well
Parallely boil the milk in a sauce pan.
Add the boiled milk to the carrots, add a pinch of salt ,reduce the heat to medium and cook for 20 mins or until all the milk is absorbed.
Now add the sugar and stir continuously till all the sugar gets absorbed.
Stir in the cashews and raisins.


Wednesday, July 05, 2006

Semiya kesari


Though Iam not a person who likes sweets, my hubby loves anything sweet.But somehow I was in the mood for making something sweet today.Had a quick nap in the afternoon and got up to make some kesari(as its the quickest and simplest to make).When I opened my kitchen closet I was disappointed to see my Rava(sooji ) box empty.I dont know how I forgot that!!! Anyway I started browsing through the cupboard, with all other alternate sweet receipes(thanks to my fellow bloggers ) running through my mind.Thats when I saw the vermicelli packet lying unnoticed in the back, along with other pasta boxes.My eyes brightened with relief cos I can make the same kesari using vermicelli and dont have to break my mind for another sweet receipe.

Here is the receipe

2 cups of Vermicilli
1 cup sugar
1/4 cup ghee
1/4 cup chopped cashews
3 tsp raisins
a pinch of kesari powder
2 elaichi powdered

Fry the cashews and raising in atsp of ghee until golden brown
In the same pan fry the vermicilli in another tsp of ghee until golden brown.set aside.
In a kadai add 4 cups of water and bring it to rolling boil, add elaichi and a pinch of kesari powder to it.Then add the vermicelli to the boiling water and cook till the water is absorbed.
Now add the sugar and mix well for 10 mins.
Finally add the remaining ghee, cashews and raisins and mix well.

Note : Adjust the amount of sugar, and ghee as per your need.
Related Posts with Thumbnails