Showing posts with label desserts. Show all posts

Sunday, February 17, 2013

Mini Heart Shaped Apple Pies

This post was intended to be posted on Feb 14th, got caught up in the usual working day routine so much, that I was not even able to get near the laptop. Hope you all had a great valentines Day.
Coming to the recipe, this is a super simple one which could be made in minutes if you have couple of apples and any type of pastry sheet in hand. I used the Empanada sheets which tasted crisp and just perfect. This dish can be made for any occasion with different shape and also different fillings, strawberry and ricotta cheese is another great combination. 
I am already thinking about many variations for fillings, both sweet and savory.


Ingredients: 
1 Apple , peeled and chopped 
1 tblsp brown sugar
1 tsp cinnamon
1 tsp melted butter
1 tsp lemon juice
Any type of pastry sheets. cut into heart shapes.
(I used empanada shells , frozen)


Method:
Preheat the oven to 400F
Mix the brown sugar, cinnamon, melted butter, lemon juice and apples, keep aside for 10 mins.
Place about a table spoon of the apple mixture in the centre of the cut out pastry sheet.
Cover with another cut out pastry sheet. press the edges using a fork.
Place them in a parchment lined cookie tray. Prick the top with fork, couple of times.

Beat 1 egg in a small bowl and brush the top of the pastry with beaten egg
Bake for 15-20 mins.


Cool before serving. Enjoy with Chocolate syrup or Ice cream.

Note:
Do not over fill the pastry, else it will ooze out.
 If the apple mixture is watery, filter the water out of it.
Set the oven temperature as per the instructions in the pastry sheet that you are using. Mine said 400F. 


Notes:

Set the oven temperature as per the instructions in the pastry sheet that you are using. Mine said 400F. 


Sending this post out to Priya's "Valentine's Day Contest


Thursday, March 08, 2012

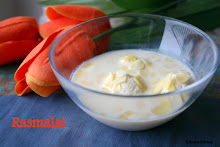
Rasmalai

A yummy dessert for all the sweet and beautiful women out there!!! 
Happy Womens Day to you all...You truly rock.


Recipe source : Manjula's Kitchen
I am at level zero for making any bengali sweets, so I followed Mrs.Manjula's recipe to core and no wonder it turned delectable.

Ingredients:
4 cups milk
1/4 cup lemon juice
11/2 cup sugar
4 1/2 cup water

For the milk mixture

3 cups of milk
2 1/2 tablespoons of sugar (adjust to your taste)
1/8 teaspoon crush cardamom
1 tablespoon sliced almonds and pistachios to garnish


Method: 
Paneer:
  • Mix lemon juice in half a cup of hot water and keep aside.
  • Boil the milk in a heavy bottomed over medium-high heat, stirring frequently making sure milk do not burn on the bottom of the pan.
  • As the milk comes to a boil, add the lemon juice slowly and stir the milk gently. The curd will start separting from the whey, turn off the heat.
  • Once the milk fat has separated from the whey, drain the whey using a strainer line with cheesecloth or muslin cloth.
  • Wrap the curd in a muslin cloth, rince under cold water, and squeeze well. This process takes out the sourness from the lemon.
  • To take out the excess water squeeze the cloth, or press the wrapped paneer under a heavy pan for about one hour. Taking the right amount of water out of the paneer is the most important part of this recipe.
  • To check if enough water is out of the paneer, take a little piece of paneer on your palm and rub with your fingers. After rubbing the paneer for about 15-20 seconds, you should be able to make a firm but smooth ball.
  • If the paneer is too dry, add a few drops of water, using the water squeezed from the paneer.
  • Once the paneer is drained, place on a dry, clean surface and knead the paneer for 3-4 minutes until the paneer is almost rolls into smooth soft dough.
  • Knead the paneer by dragging the palm of your hand hard on the paneer. Keep scooping it back to together and knead more. Your palm will be little greasy.


For the Rasmalai:
  • Divide the dough into 12 equal parts and roll them in smooth balls.
  • To make the balls apply some pressure at the first and then release when forming the balls, lightly press to make about 3/4″ patty shape. 
  • Mix the sugar and water in a pressure cooker on medium high heat and bring to a boil.
  • Add the paneer balls and close the pressure cooker. After the pressure cooker starts steaming, turn the heat to medium and cook for about seven minutes.
  • Make sure the cooker is large enough to accommodate the finished rasgullas patties, as they will expand to about double in the volume while cooking in the syrup!
  • Close the heat and wait a few minutes before opening the pressure cooker. Pour cold water over the cooker before opening.
  • Take out the patties from the syrup and squeeze them lightly,and keep aside.
  • Boil the milk in a frying pan on medium heat until the milk reduce to about 2 cups.
  • Make sure to frequently stir the milk as the milk burns easily in bottom of the pan.
  •  Add the sugar and the Rasmalai patties in milk. Let it cook for few minutes.
  • Add the cardamom and mix in. Garnish with sliced almonds.
  • Serve the Rasmalai chilled.

And finally this ones for me as today is my 7th blog anniversary. Ya its a long time...but its been a slow and steady adventure for me, with lots of pictures  :) and also breaks!!.
I am  learning new things everyday through this wonderful community of bloggers and I love every bit of it.  I started taking pictures of the food just to post in the blog and now its become a passion for me. I am also learning new tips and techniques on that front through all my fellow bloggers and thank you all for sharing your experiences.


Have a great Weekend !!!

Monday, February 13, 2012

Strawberry 'n Cream Jello Hearts

A very simple and delicious dessert for Valentine's Day.


Ingredients:
1 packet of strawberry jello (30 gms)
1/3 cup boiling water
1/3 cup or 5 oz can of Evaporated milk
Any white chocolate chunks - I used 4 mini toblerone squares


Method:
Add 1/3 cup of boiling water to the jello mix. Stir well to combine.
Combine the evaporated milk and the chocolate chunks in a microwave safe bowl and microwave for 2 mins.
Stir well to combine. Add this to the Jello mixture.
Pour into the desired moulds or Ice cube trays.
Refrigerate for 30 mins or until set.


Note:
Condensed milk can also be used instead of evaporated milk, but it turns out a little more sweet.


Sending this post to all the following events out there
"Valentine Fest - Served with Love  st Sizzling Tastebuds

Check out my other heart shaped valentine treat  Shortbread cookies with chocolate dipping

Happy Valentines's Day  :)

Sunday, February 14, 2010

Multi Fruits Kesari


Made this Kesari today ..The recipe is same as the Pineapple Kesari which I have posted earlier.The only difference is that I added muliple fruits ( store bought Can) instead of pineapple. I added red food color instead of kesari powder just to cut ot some hearts for Priya's Valantine's day event.


Happy Valentines day to all the lovely ladies out there...


Sending this also to the Valentine's day carnival event at "TheFunAndFoodCafe" by Mansi

Friday, July 31, 2009

Cherry cake

Baked this beautiful cake past weekend with some leftover cherries from the farmers market.
Browsed a lot of recipes from the net and finally settled on the one from Joy of Baking.
I followed the recipe as given, but had to replace the sugar with brown sugar, as I realised that I ran out of white sugar, after beating the eggs.
But the cake baked beautifully and was delicious.I made this in the evening and the cake plate become empty by the time we had tea.
Ingredients:
1 pound (454 grams) fresh cherries, pitted
1 1/2 cups (195 grams) all purpose flour
1 1/2 teaspoons baking powder
1/4 teaspoon salt
2 large eggs
3/4 cup (150 grams) brown sugar
1/2 cup (113 grams) unsalted
butter, melted and cooled
1/3 cup (80 ml) milk
1 teaspoon pure
vanilla extract
Zest of 1 lemon
Method:
Preheat oven to 400 degrees F (205 degrees C).
Butter and flour an 9 inch (23 cm) spring form pan and line the bottom of the pan with parchment paper. Set aside.
Rinse, dry, and pit all the cherries. Cut the cherries as desired.
Take about 1/4 (about 15) of the cherries (to be placed on the top of the cake during baking) and cut them in half.
In a separate bowl whisk together the flour, baking powder, and salt. Set aside.
In the bowl , beat the eggs and sugar until thick and lemon colored (about 3-5 minutes).
Add the melted butter, milk, vanilla, and lemon zest and beat just until incorporated.
Add the flour mixture and stir just until moistened. Gently fold in the whole pitted cherries.
Pour the batter into the prepared pan, smoothing the top with an offset spatula.
Bake for 15 minutes then remove from oven.
Quickly arrange the remaining cherries, cut side down, on the top of the cake.

Return the cake to the oven and bake for a further 20 minutes or until golden brown and a toothpick inserted into the cake portion comes out clean.
Remove from oven and place on a wire rack to cool slightly.
Serve warm or at room temperature with a dollop of softly whipped cream.
Makes 8 - 10 servings.

Source : Joy of Baking


Monday, May 11, 2009

Tried and Tasted - Pears Walnut Upside Down Cake

Past weekend I was searching for a simple cake recipe, as I had invited some friends for dinner.Came across Sunita's post on "Pears Walnut Upside Down cake" .The pictures tempted me to give it a try, and morever I had all the ingredients in hand.Then what else do I need, I whipped it up in less tha 15 mins and baked for half an hour.
The result was an absoluetly delicious cake.We had it with Ice cream. Even my 18 months old toddler seemed to like it very much.


The recipe remained the same, but I added a tsp of cinnamon along with fruits and sugar, and baked it in a slighly larger pan than hers.So I got a thinner and a dark colored version of the cake. Here are the pictures.


Wednesday, May 06, 2009

Pineapple Upside Down Cake

Since I have started blogging after a long break, its quite difficult to catch up on the food events and the hustle bustle of the food blogosphere.But its very interesting to find lots of new event chains, and many new food blogs.
Checking on some of the old and favorite events first, I came across the good old Monthly Mingle event hosted by Meeta of "Whats for Lunch honey". The Theme for this months event promptly reminded me of my "Pineapple Upside Down Cake' which I made last spring, and somehow didnt get to post it.

So now is the right time for that.... here goes the recipe.


Ingredients:
3 tablespoons butter
3/4 cup brown sugar, firmly packed
6 slices pineapple or 1 can (20 ounces) can of drained pineapple chunks

Cake
1/2 cup butter
1/2 cup sugar
1 egg
1 1/2 cups all-purpose flour
1 1/2 teaspoon baking powder
1/2 teaspoon salt
1/2 cup milk

Method:
Melt little butter in the cake pan; sprinkle with brown sugar. Arrange pineapple pieces on sugar, making a design.
Cream 1/2 cup butter; gradually add 1/2 cup sugar and beat until light and fluffy. Add egg and beat well. Add sifted dry ingredients alternately with the milk; beat until smooth, ending with dry ingredients. Pour over arranged pineapple pieces.

Bake at 180°C for about 35 minutes.


Let cake cool for about 5 minutes before turning out onto a serving plate.
Serve warm with whipped cream, if desired.


Related Posts with Thumbnails