Pages

Sunday, March 25, 2012

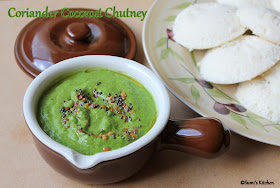
Coriander/Cilantro Coconut Chutney

Here is a simple recipe for a coconut based chutney from my day to day cooking. This chutney brings out the flavor of cilantro/coriander and is a great accompaniment for idli's and dosa's.


Ingredient:
1 bunch coriander (approximately 3 cups, loosely packed)
2 tblsp urad dhal
2 red chillies/green chillies
1 inch ginger
4 tblsp shredded coconut(fresh or frozen)
1 small marble size tamarind (1/2 tsp tamarind paste)
salt as required.
Tempering
1 tblsp sesame oil(or any oil)
1 tsp mustard
1 tsp urad dhal

Method
In a pan add 1 tsp of oil and fry the urad dhal till golden brown.Keep aside.
In the same pan slightly fry the red/green chillies and ginger.
Reduce the heat to low and the stir in the roughly chopped coriander/cilantro leaves for about a min or until wilted.
Grind everything along with coconut and tamarind to a smooth paste.

For tempering .
Add a tblsp of sesame oil in a pan.When its hot add the mustard and urad dhal.When the mustard pops switch off the stove and mix in with the chutney.


Notes:
If using frozen coconut, defrost in microwave for 2 mins and then grind using some luke warm water.
Equal parts of mint and coriander can also be added to make mint coriander chutney.
Do not cook the coriander leaves for more time, stir in low heat just until they are wilted ( just a minute or less).I usually do this after switching off the stove.

Linking this chutney to Julie's " Herbs and spices event " at Erivum puliyum where this months theme is coriander - cumin .

Friday, March 16, 2012

Lemon Blueberry Bread

I had a packet of frozen blueberries in the freezer with the idea of making a smoothie. Tried it once and the kid didnt like it at all. So I used half of them in this blueberry muffins earlier and the rest went into this delicious blueberry bread. Do try this recipe, its definitely a keeper.


Source - JoyOfBaking
Ingredients:
 1 1/2 cup All purpose flour
1/2 cup butter softened at room temperature 
1 tsp baking powder
1/4 tsp salt
3/4 cup granulated sugar
1 tblsp grated lemon zest
1 tsp vanilla extract
2 eggs
1 cup fresh or frozen blueberrries
1/2 cup milk


For the lemon glaze:
 2 tablespoon white sugar
1 tablespoon fresh lemon juice.


Method:
Preheat the Oven to 350F
Prepare a loaf pan by buttering up the sides and bottom.
In a large bowl add the flour, baking powder and salt, whisk well to combine.
Take a table spoon of this flour mixture in a small bowl and gently coat the blueberries.

In an other bowl cream the butter with the electric mixture until soft.
Add the sugar and beat for another 2 -3 minutes till it becomes creamy. 
Add the egg one by one and beat well to incorporate.
Scrape the sides of the bowl using a spatula and beat the mixture till its smooth and pale.
Now add the flour mixture in three additions alternating with the milk, ending with the flour.
Gently fold in the blueberries. Do not overmix.


Transfer the batter to the prepared loaf pan and bake for 50-60 mins or until the toothpick inserted in the center comes out clean.


For the glaze:
Place the pan on a wire rack. 
In a microwavable bowl add the sugar and lemon juice , warm it up for 20 secs or just until the sugar dissolves.
Poke holes on the bread with a tooth pick and then gently brush the top with the warm liquid. 
Remove from the pan after 20 minutes.


Notes:
If using frozen blueberries , do not thaw, toss with flour and directly add to the prepared batter.
Do not skip the glazing part, its not too sweet and gives the bread a moist texture.


Tuesday, March 13, 2012

Chunky Guacomole With Baked Pita Chips

I used to hate Guacomole when I first tasted it in a mexican restaurant and stayed away from avacado for quite some time. But then a few years back I was introduced to this chunky version of the dip by a dear friend S (back in Belgium) in her son's birthday party. After numerous assurances from her I gave this a try and absolutely fell in love with the dip and also with the wonder fruit - avacado ever since.
Thanks to S ,nowadays I make it atleast once a week  for snack as my son loves this 'green' dip (as named by him) a lot. The tastes of the Guacomale is at its best when the Avacado is ripe, moist and in season. Never use the blackened or over ripe ones as it tends to spoil the taste.

Serve with some baked pita bread for healthy version or with some store bought tortilla chips for quite an indulgence :)


Ingredients:
1 ripe and firm Avacado
1/4 cup chopped onion
1/4 cup chopped tomatoes(without pulp)
1/4 cup chopped cilantro
1 small green chilli finely chopped.
salt ,coarse black pepper and fresh lemon juice to taste

Method
Cut and scoop the pulp of the avacado int a bowl.
Cut the tomato into half, and sqeeze the pulp out of it, discard the pulp and add the chopped tomato to the bowl.
Now add the onions, chilli, salt, coarse black pepper and chopped cilantro
Give it a mix with a fork, gently breaking down the avacado pieces..

To make the pita chips.
Cut open the pita bread into two discs. (I used it whole here)
Cut into triangles and bake in 400F preheated oven for about 10 -15 mins, or until it becomes crisp.


Notes:
If you like the smoother version, mash the avacado well with a fork to a smooth texture and then add all the other ingredients.
Always use freshly ground coarse black pepper as it gives much better flavour to the dish.


Thursday, March 08, 2012

Rasmalai

A yummy dessert for all the sweet and beautiful women out there!!! 
Happy Womens Day to you all...You truly rock.


Recipe source : Manjula's Kitchen
I am at level zero for making any bengali sweets, so I followed Mrs.Manjula's recipe to core and no wonder it turned delectable.

Ingredients:
4 cups milk
1/4 cup lemon juice
11/2 cup sugar
4 1/2 cup water

For the milk mixture

3 cups of milk
2 1/2 tablespoons of sugar (adjust to your taste)
1/8 teaspoon crush cardamom
1 tablespoon sliced almonds and pistachios to garnish


Method: 
Paneer:
  • Mix lemon juice in half a cup of hot water and keep aside.
  • Boil the milk in a heavy bottomed over medium-high heat, stirring frequently making sure milk do not burn on the bottom of the pan.
  • As the milk comes to a boil, add the lemon juice slowly and stir the milk gently. The curd will start separting from the whey, turn off the heat.
  • Once the milk fat has separated from the whey, drain the whey using a strainer line with cheesecloth or muslin cloth.
  • Wrap the curd in a muslin cloth, rince under cold water, and squeeze well. This process takes out the sourness from the lemon.
  • To take out the excess water squeeze the cloth, or press the wrapped paneer under a heavy pan for about one hour. Taking the right amount of water out of the paneer is the most important part of this recipe.
  • To check if enough water is out of the paneer, take a little piece of paneer on your palm and rub with your fingers. After rubbing the paneer for about 15-20 seconds, you should be able to make a firm but smooth ball.
  • If the paneer is too dry, add a few drops of water, using the water squeezed from the paneer.
  • Once the paneer is drained, place on a dry, clean surface and knead the paneer for 3-4 minutes until the paneer is almost rolls into smooth soft dough.
  • Knead the paneer by dragging the palm of your hand hard on the paneer. Keep scooping it back to together and knead more. Your palm will be little greasy.


For the Rasmalai:
  • Divide the dough into 12 equal parts and roll them in smooth balls.
  • To make the balls apply some pressure at the first and then release when forming the balls, lightly press to make about 3/4″ patty shape. 
  • Mix the sugar and water in a pressure cooker on medium high heat and bring to a boil.
  • Add the paneer balls and close the pressure cooker. After the pressure cooker starts steaming, turn the heat to medium and cook for about seven minutes.
  • Make sure the cooker is large enough to accommodate the finished rasgullas patties, as they will expand to about double in the volume while cooking in the syrup!
  • Close the heat and wait a few minutes before opening the pressure cooker. Pour cold water over the cooker before opening.
  • Take out the patties from the syrup and squeeze them lightly,and keep aside.
  • Boil the milk in a frying pan on medium heat until the milk reduce to about 2 cups.
  • Make sure to frequently stir the milk as the milk burns easily in bottom of the pan.
  •  Add the sugar and the Rasmalai patties in milk. Let it cook for few minutes.
  • Add the cardamom and mix in. Garnish with sliced almonds.
  • Serve the Rasmalai chilled.

And finally this ones for me as today is my 7th blog anniversary. Ya its a long time...but its been a slow and steady adventure for me, with lots of pictures  :) and also breaks!!.
I am  learning new things everyday through this wonderful community of bloggers and I love every bit of it.  I started taking pictures of the food just to post in the blog and now its become a passion for me. I am also learning new tips and techniques on that front through all my fellow bloggers and thank you all for sharing your experiences.


Have a great Weekend !!!

Tuesday, March 06, 2012

Mutton Kuzhambhu / Lamb Curry

Here is a delicious recipe for mutton kuzhambhu passed on by my grandmother to my mother and now to me. We rarely include mutton/lamb in our diet probably once a year and that's the reason why it took so many years  for this recipe to be posted in this blog.The original recipe calls for grinding the masala one by one to a smooth paste. Ya, they did that in the good old days when they did'nt have any access to ready made masala powders, using the 'Ammi kal'  (stone grinder) by hand. Though my mom followed the method for quite some time she switched to the mixer eventually. She also adds some potatoes which gives a unique flavor to this dish.
I have given the original recipe as such and also some modifications needed to suit our kitchen :)


Ingredients :
500 gm Mutton/lamb chopped
1 medium onion
1 medium tomato
1 tsp chilli powder
2 tsp coriander powder
1 tsp turmeric powder
2 medium potatos peeled and cubed
1/2 cup chopped coriander leaves
for tempering 
1 tsp sombhu/ fennel seeds
few curry leaves
Paste 1
8 cloves garlic
1 inch piece of ginger
Paste 2:
1 inch cinnamon
4 cloves
Paste 3:
1 tsp whole pepper
2 tsp jeera/cummin
 Paste 4:
1/4 cup shredded coconut
1 tsp poppy seeds (optional)  - I didnt use


Method:
Traditionally each masala set is ground seperately.
But here is how I made it.
Grind the garlic, ginger, cinnamon, cloves, pepper and jeera to a smooth paste.keep aside.
Next grind the coconut and the poppy seeds (optional) to a smooth paste. keep aside.
Pressure cook the mutton with salt, turmeric, and 1/2 tsp of chilli powder and 1 cup water for  upto 4 - 5 whistles.


In a thick bottomed sauce pan, add 2 tblsp of oil.
Add the fennel seeds and curry leaves when the oil is hot.
Then add the chopped onion and fry till translucent.
Reduce the heat to medium and add the ground masala paste and fry for couple of minutes.
Then add the chopped tomatoes and salt fry till the oil seperates on the sides.
Now add the chilli powder, coriander powder, and turmeric powder and mix well. 
Add the cubed potatoes and about 1/2 cup of water and cook covered for 3-4 minutes.
Then add the cooked mutton along with the water. Mix well, cover and cook for 10 mins.
At last add the ground coconut mixture, chopped coriander leaves and cook uncovered for another 2 mins or just until it comes to a boil again. 
 Serve hot with steamed white rice


Notes/Variations:
  • Poppy seeds are optional, I didnt use it for this dish
  • I follow the same recipe to make chicken kuzhambhu
  • This recipe is a bit on the spicier side, reduce the spice levels or increase the coconut to 1/2 cup for a mild/less spicy version and vice versa.
  • If its difficult to make the paste in your blender  try the following - Mix together 2 tblsp of ginger garlic paste(readymade) with 2 tsp of garam masala , 1 tsp pepper powder and 1 tsp jeera powder. 
  • You can also use thick coconut milk instead of coconut paste although there will be a slight difference in taste.
  • Cauliflower and potatoes makes a great vegetarian substitution.
Other Related recipes:
Chettinad chicken kuzhambhu/curry 
Lamb/Mutton soup
Mutton Chops Pepper fry

Thursday, March 01, 2012

Cilantro Yoghurt Dip

I started using this dip as a basic sauce for my pita bread sandwich.We liked it so much that nowadays I prepare this as a dip for any type of North Indian (Samosa, Aloo tikki, Pakora...) or South Indian snacks( Bhajji, Pakoda, Chilli gobi...). Its also a great way to finish off any leftover sour cream in the refrigerator, which is a nice alternative to yoghurt.

Ingredients:
2 cups Cilantro/Coriander leaves tightly packed.
2 garlic cloves
1/2 cup of thick yogurt/sour cream
1 green chilli *
1 tsp Jeera/cumin seeds.
1 tblsp lemon juice.

*Increase or decrease the amount of green chillies as per your spice level.

Method:
Add all the ingredients to the blender and grind it to a smooth sauce.
Serve with your favorite snack.


Sending this delicious dip over to The Big Chutney Chow Down At  Priya's Now Serving and
The Ep- series : Herbs and Spices at Erivum Puliyum where this months theme is Cilantro and cumin.


Before ending this post I want to thank Asiya Omar for passing on this beautiful award to me
I love both her blogs in tamil and in english full of authentic recipes.
Thanks Asiya for thinking about my blog :)
I would like to pass it on some of the other wonderful bloggers that I recently came across..

Shobha Shyam of  Good Food 
Maha of  Maha's lovely home
Anu of Hot Pot Cooking
The South Indian Home
Suja Manoj at Kitchen corner